Pages

Wednesday, September 30, 2009

♥ Airy Azure Franken - Good vs. Evil ♥


Here is a quick Diagional mani to showcase the Good and Evil 'Airy Azure' Franken Polish's I made recently. Just in case you are curious, Here are the full posts of the GOOD & EVIL franken Polsih's from the GOOD vs. EVIL collection. (LINKS). This was a quick sloppy job as I am eager to paint my nails with 'Tart - EVIL' ASAP♥

'Airy Azure - GOOD' Version

'Airy Azure -EVIL' Version

GOOD vs. EVIL Collection

~ Shade - Flash ~

~ Shade ~

♥ 'Airy Azure' GOOD - Franken ♥


~ Franken 'Airy Azure GOOD' 2 coats ~


Here is one of my latest Frankens from my 'GOOD vs. EVIL' Collection. 'Airy Azure - GOOD', it is a very pretty, light-light Robbin's egg blue. I looooove this color, ( I say that about everything ) I am elated that this polish turned out so well, and will definitely be wearing this often. It's perfect for my TOEZ♥. I started with a half of a bottle of Sally Hansen Hard as Nails - NUDE ( a clear ), and added 1 gram of Loreal Shimmering Loose Powder in 'Airy Azure', 2 Ballz and shook it up. Viola - I will hunt around for another polish to compare this to.


~ 'Airy Azure GOOD' -Shade ~


♥ 'Airy Azure' - EVIL Franken ♥


~ Above EVIL Franken 'Airy Azure' 2 coats ~
~ 2 coats of Nailene Acrylic strong T.C. ~


To read more about my series of GOOD vs. EVIL Frankens check out THIS POST. I did not expect much from he EVIL version of 'Airy Azure', however this turned out to be a lovely shimmery steel Grey. I was hoping that the blue would show up a little more - but I needed a good steel Grey in my collection.. IRL this appears to have a textured finish to it. but it is a lovely smoothe matte finish.


I started with 1/2 a bottle of Sally Hansen Hard As Nails, in 'Black Night' a black that is not quite opaque, which I picked up for $.99 cents at Canadian Superstore. I then added 1 gram of Loreal On the Loose Shimmering Eye Shadow powder. I added 2 coats of Nailene Acrylic Strong, and viola - my new favorite steel Grey. Frankens can be hard to work with, you gotta be fast when applying. Personally I like working these 'pigment/shadow' formula's, I am a fats painter.


~ Shade/Flash ~


~ Sunshine Close-up ~

~ Sunshine Close-up ~


~ Shade Flash ~

~ Shade - No Top Coat ~


♥ GOOD vs. EVIL Frankens♥


~ Airy Azure Franken, Tart Franken, Sparkling Mist Franken~


OKAY - I am not sure why these are not posting in proper order but here is the first Good vs. Evil Pair...........................
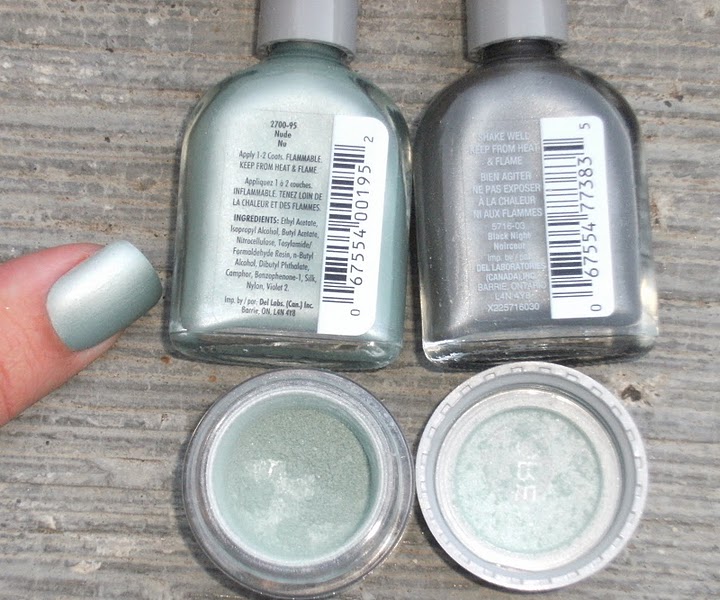
'Airy Azure' -GOOD
'Airy Azure' - EVIL


I seriously miss Dr. Franken Polish and Never too much glitter's posts about any sort of frankening. So on Friday night I whipped up, like, 20 Franken Polish's, Here is the first six= A collection I call " GOOD vs. EVIL " I have already swatched and will post two,- 'Airy Azure GOOD vs. EVIL' .... and hope to get these 'all blogged about' very very soon.


I started with 3 Loreal loose eye-shadows that I picked up in Grand Forks at the Dollar Tree, for $1.00 each USD, and 3 bottels of Sally Hansen CLEAR NAIL POLISH, and 3 bottels of BLACK Sally Hansen nail polish. = These were.99 cents at Superstore a month ago, but any clear/black polish will do. I knew I was doing a good Vs. Evil with these 'pigments' and so I needed to find 3 black and 3 clear. I was soooo excited to be making these, that I did not take before photos of the clear and black polish bottels.....hopefully this is not confusing to anyone♥


I was hoping to pick up Wet & Wild polish's, as they are available in the U.S. as well as Canada- However these Sally Hansen's worked out perfectly, The Wet n' Wild Black will be way too black for the small amount of pigments I wanted to use - and these Sally Hansen 'Black' was much more sheer than Wet n' Wild Black.♥ These Sally Hansen H.A.N.'s can often be found at PharmaSave and Rexall ( drug stores in Canada) for .99 cents Canadian.


So first, I emptied half of ALL six bottels into a secure receptacle for future use. I measured 1 gram of pigments for each bottle, which was roughly half the contents of these loose Loreal eye-shadows, and added it to each polish bottle. I made paper cones out of notepad paper, and slowly added the pigments to each bottle. I dropped in two BALLZ and then shook, shook, shook. There is a photo further down this post of the setteling that happens when you mix pigments/eyeshadow with nail polish.... not to worry, a good shaking is all it takes to fix that. And that, is that - ENJOY and stay tuned for the rest of my 20 or so frankens.....


~ Flash ~
~ Airy Azure Franken, Tart Franken, Sparkling Mist Franken~


♥ 'Tart - EVIL' Franken ~ T.O.T.M-W. ♥

~ Franken 'Tart-EVIL' 2 coats & 2 coats of T.C.~

Here is the Franken 'Tart-EVIL' for my T.O.T.M-W. I did manage to wear Teal colors for 'Teals For Toes' ( September = Cancer Awareness Month). Here is my last T.O.T.M-W. ~Wet n' Wild 'Caribbean Frost'. These Wet n' Wild's are quite sheer and needed more than 3 coats ( boooooooooooo ) but they are very pretty and are only $1.50 ish in Canada..... So I can't ( and shouldn't) complain.


I made this with the same method as all my Frankens from the ' GOOD vs. EVIL Collection. I definitly should have used 3 coats for this one, as there are some apparent bare spots. This polish will be my next mani. I absolutely love it. It will be easier to take better photos of my nails than my toes. I have found difficult to take quality photos of pedis recently, that's why I have posted so few T.O.T.M-W.'s lately. But i hope to get that sorted out.....


~ Below - Sunshine ~

~ Below - Sunshine ~


~ Below - Sunshine ~


~ Below - Sunshine/ Shade ~

Monday, September 28, 2009

♥ French Mani week @ Deez Nailz - S.H. 'Candy Lace' with Black Tipz♥


~ 2 coats of Sally Hansen 'Candy Lace' ~
~ Nailene 'Black French Tip Pen'~
~ Wet N Wild 'Sparked' ~


I love how the pieces of .....fleck (?).... look in this antique Sally Hansen polish 'Candy Lace'. This polish is not as dense glass-flecked as the China Glaze Summer Collection, and I think that the pieces are alot bigger and more random sized. I love this polish and am sad that I 'wasted' it trying to whip up some frankens ~ I do hope to find something similar in the future to replace it.


For this mani I used 2 coats of Sally Hansen 'Candy Lace', waited for it to dry, then applied a coat of Nailene Acrylic Strong Top Coat and let it dry totally. I didn't want to add anything more to this mani, but of course I had to do something..... I then used Nailene French Tip Pen in Black, { Freehand- this time} and waited for that to dry. I then applied 2 coats of Naielne Acrylic Strong Top Coat to the black tips only, let it dry then finally added a thin line of Wet n' Wild "Sparked" . I added a layer of T.C over the whole thing = CUTE! I did not do a thorough clean-up job - I am trying to be kinder and gentler to my cuticles these days......


I am very happy with this mani and will be doing this again with my Pure Ice 'Strapless' for the smile line & a more blue-er, duo-chrome base. The shape of the applicator tip of the Nailene French Mani pen makes doing 'french' tips very easy - this one I did free hand because I planned on doing a stripe of glitter across my nail's smile line. I am hunting for the French Tip Pen in white this week = word is Shoppers (drug store = CANADA) has them with a free nailene Top Coat so I am hoping to snap one up - I will kick myself later if they are sold out before I get one!


~ Indoors Fluorescent Lighting ~

~ Shade ~


~ Indoors Fluorescent Lighting ~


~ Shade ~


~ Sally Hansen Candy Lace 2 coats ~
&
~ 2 coats of Nailene Acrylic Strong Top Coat ~


♥French Mani week @ Deez-Nailz = 9 coats♥


3 coats of white- 4 coats of the shimmery pink color and 2 coats of clear top coat.. everything was going well, drying time was satisfactory I took time to have the polish dry between layers. I applied my final layer of top coat and then I carelessly LAID MY HAND = NAILS SIDE DOWN= ON THE CONCRETE STEPS I WAS SITTING ON!!!!! I was sooooo cautious and careful - but i totally marred my mani! UGH! I had hoped that I could pull this 9 layers of polish off, and everything was going great.... Normally I would never use more than 4 layers of polish, including top coat, but I really, really wanted to see how this would turn out♥ Untill I began looking at blogs and NailGal I never really appreciated how beautiful multi-layered mani's and 'jelly' finish polish's can be.

Anyhoo- here's what I did -

~ 3 coats white
~ 4 coats shimmery pink color
~ 2 coats Nailene Top Coat
_________________
= 9 Coats of polish - Deez Nail Most Coats ever!!!!!!!


I was really miffed when I messed this up!


But= in situations like this, nail stickers come in handy. I overdid it on the thumb, I admit, but these cute flowers are so lovely, I couldn't stop! Nailene has been kind to me, and sent some goodies to try out. Most of the stickers in this set will look great over dark polish. Nail stickers have certainly become alot more intricate over the years I absolutely loooove the teeny-tiny 'rhinestone' dots pictured in the upper left hand corner below, while they appear minuscule; they were very easy to work with, and will look great with a darker polish on a future mani.


~ Below Shade ~

~ Shade ~

~ Shade w/Fash ~

~ Indoors ~
~ Looooooove 'the Claw' pose ~


~ Indoors fluorescent Lighting ~

~ Indoors fluorescent Lighting ~


~ Shade ~
~ Shade ~
~ Shade ~

~ Indoors fluorescent Lighting ~

~ Indoors fluorescent Lighting ~

~ Shade ~
~ Sun/Shade ~
~ UGGGGGGGGGGGHHHHHHHHHHHH~

Sunday, September 27, 2009

♥ Arissa 'My Favirote Red' ♥


~ Arissa 'My Favorite Red ~ 2 coats & 2 coats T.C. ~

Here is the lovely Arissa 'My Favorite Red' 2 coats, on my RING finger I swiped a coat of black as a base. WOW- that is pretty- layering always ends up being the showstopper for me ♥ ! I found this polish at the Family Dollar in Grand forks North Dakota on a Bizzinezz trip in summer time - I picked up another pretty purple that can be seen swatched HERE, and HERE. This polish was $2.00 USD - they had a few other colors but I only grabbed 2 for now. I have seen a few other pretty Arissa polish's swatched HERE. I will definitely pick up a few more in the future.


I am still focused on 'French manicure Week at Deez Nailz...... Except it is turning into more like a French manicure month at Deez nailz. For this week-end I needed to get some color on my Tipz..... I will soon be posting a mani with the most layers of polish I have ever worn, ever!


Wednesday, September 23, 2009

♥ N.Y.C. 'Skin Tight Denim' ♥


N.Y.C. Skin Tight Denim 2 coats
&
2 coats of Nailene Acrylic Strong Top Coat


This is the most richly pigmented and inexpensive nail polish I have come across. I had passed on any new N.Y.C. polish's that I have seen recently as I was not impressed when I first tried them a long, long time ago. But Now I will be looking to add some more of these babies to my collection. This polish, 'Skin Tight Denim' is soooo impressive, I easily could have gotten away with 1 coat application in this one. I love this color, this finish and the drying time and the survival rate = everything. I will definitely be giving N.Y.C. a second look when I finish up with all my future swatching ( sigh). In Canada these N.Y.C. polish's are $2.00 -ish in stores. I hope that the rest of them apply just as well and are as opaque as 'Skin Tight Denim'.


~ Shade ~


~ Shade with Flash ~


~ Evening Sun ~


~ Shade ~